The most burning question I had when delving into music production for the first time was how to create a convincing rhythm and beat section. Already familiar with synths and harmonies, I had no clue where to start rhythm-wise on the blank Logic screen. All I knew was that I didn’t want to touch the nasty Drumkit Designer with a bargepole, which looks like something out of the Sims Superstar expansion pack.

A few weeks in and I’ve unearthed my options and am having loads of fun exploring and layering things up. Here’s what I’ve found out so far.
As with all sound production, there are two types of signal: audio and MIDI. Put simply, audio is a direct recording of a sound as it happens – a clap, a tambourine, a snare, a whole drumkit. Meanwhile, MIDI is a digital collection of information regarding pitch and note length – something similar to sheet music – which is then ‘played’ by whatever software instrument you’re using. You could even get pretty deep and say audio captures something from the past, whilst MIDI is a projection of the future.
Both formats can be used for the rhythm section. With audio it’s as simple as layering up pre-recorded clips into whatever pattern you choose, which could look something like this:

In a post soon I’ll delve into how to bring these multiple tracks together as one rhythm section – it’s a massive topic. For today though, I want to talk about what I’ve found using MIDI and Logic’s drum synthesiser Ultrabeat. I’m particularly interested in this because in the process of synthesising a beat, you really get to the DNA of different percussive noises, and in doing so gain much more control over the sound you create.
If that all sounds a bit high concept, here’s how I made a kick drum sound – and hopefully you’ll see what I mean.
In Ultrabeat, you start with a no-frills sine wave – essentially just a sustained bleep sound – which you can sculpt into recognisable percussion sounds by altering a few key parameters on this funky interface (don’t be afraid).

Think about how a kick drum sounds. It has a lot of impact at the very start, and then fades pretty quickly (unless you’re U2 on an arena tour, in which case this is not the blog for you). It is of course a very low pitch, getting lower as it fades away, and it’s a rounded, even dulled sound.
The default shape of the sound on Ultrabeat looks like this:

The note above is sustained for way too long to sound much like a kick drum – you want it to fall away much more quickly, so you might end up with something like this instead:

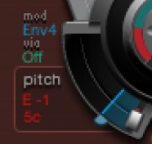
The next step is to bring the pitch way down from the default middle C…

As a way of making it extra kick-y, you can set up Ultrabeat to start the note at one pitch (the blue line below) and finish up even lower, achieving the same effect as a quickly fading bass drum. Cue tiny screenshot number 2.
And that’s a kick drum!
So, how about a shaker? That’s a much tougher sound for a machine to emulate, given that it is subject to a lot of human variation – is the player emphasising a certain beat of each bar? Is each shake independent of the next, or is it a continuous sound? Let’s do it.
Firstly, a shake should be formed out of ‘noise’, rather than a melodic sine wave like the kick drum. In its raw format, this sounds like a nasty blast of white noise. Again, the shape of each note needs to be modified, the key difference being that a shaker sound begins and fades much more gradually than the kick drum, so the curve could look like this:

You can make the white noise starting point less aggressive by switching on the filter and lowering the cutoff, or switching off the sustain. Most crucially to gain an authentic sound, however, you need to mimic the variation of a human player. This can be done by altering the loudness and length of each note in your cycle. Ie moving from this set of Ballard-esque tower blocks….

… to something much more organic. Intuitively, the height of each bar corresponds to the loudness, and the width represents note length. The sound of this pattern sounds like a player emphasising the second beat of each bar. It’s pretty dancey.

Over the past few weeks I’ve ended up with various patchworks of midi and audio snippets – then the trick is navigate your way sensibly through the dazzling sweetshop of effects that Logic has to offer, and to manipulate the disparate parts into one cohesive sound. A story for another day.
Thanks for stopping by!
